Scheduling of Database Migration tasks
The best way to keep your databases up-to-date and launch sync or migration jobs regularly is to use Built-In Scheduler. It is available for all synchronizers and converters listed at our web site.
Scheduled jobs with sessions and batch files as parameters are launched as services running in background. Scheduler allows keeping migration tasks unattended and executes them automatically at specified time or a particular period of time.
Easy-to-use wizard interface helps to set up scheduling process with minimal efforts to save hours of routine work.
Follow these simple steps to set up scheduling process:
Scheduling stage
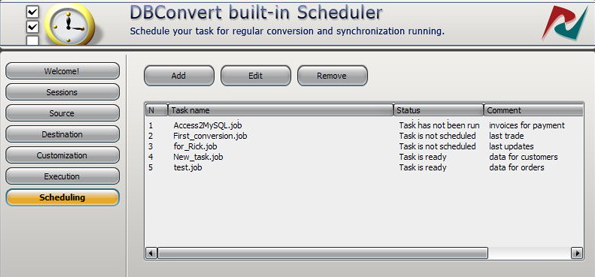
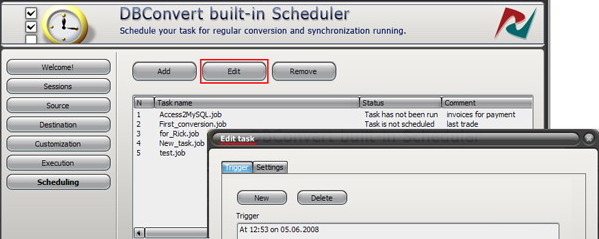
Clicking the “Scheduling button”, as shown on picture below, opens up opportunities to add, edit and remove scheduling tasks to be executed at specified time.
Add new task
Click on the "Add" button to put a new scheduled job in the list of executed tasks. "Add new task"dialog appears where you can specify additional parameters.
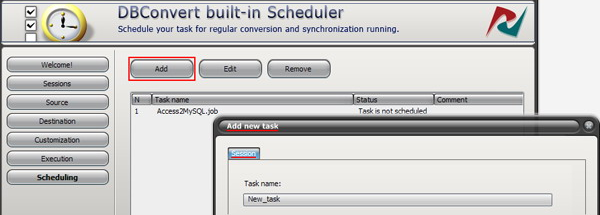
In the "Session" tab enter a name for a task in "Task name" field which describe it the best.
Select desired application from "Application" list to be launched. An application itself is chosen by default.
Specify previously saved session or a current one at “Session” field.
"Running file" field keeps the path to an executable bat file.

Click “Ok” button to save settings.
Edit scheduled task
Press "Edit" button to edit the currently selected scheduled task. Or you can double click a task at listbox. Specify task settings in "Edit task" dialog box.
"Triggers" tab contains fields for setting up triggers conditions specify the triggers conditions for each task. Read more information about triggers adjustments
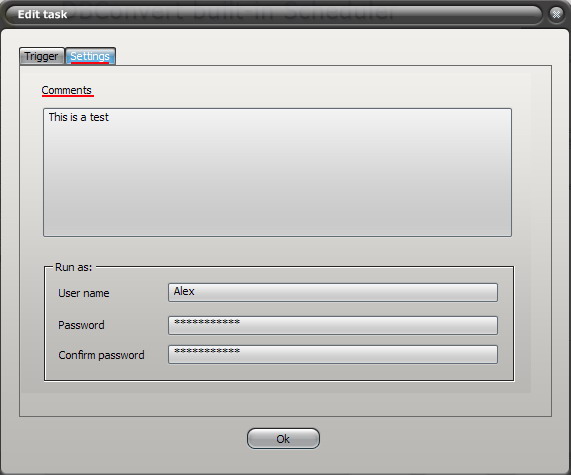
You can add notes/ description for each scheduled job at the "Settings" tab. This information will be shown in the main window.
The next fields are requiered for proper scheduling process. Otherwise your task won't be executed. Enter your user login and password for Windows system into the fields "User name" and "Password". Repeat your password at "Confirm password" field
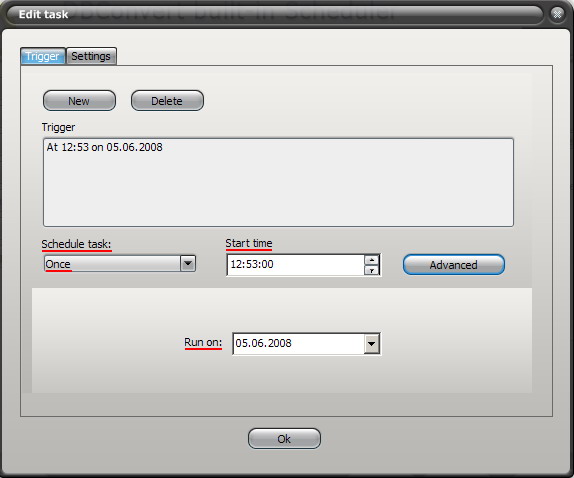
Trigger Settings
Our built-in Scheduler launches migration jobs using triggers specified in "Trigger settings" dialog. You can setup triggers to start tasks depending on definite date and time in any combination.
Use "New" and "Delete" buttons to add new triggers and remove unnecessary ones accordingly.
Please Note that New triggers can be added not only for new tasks but for the already existed ones as well.
Each scheduling task has its own execution status showing what currently happened or should happen with selected task. Here is the list of possible status messages:
- Task is running - selected task is currently executing
- Task is ready - the task is ready to be launched at the next scheduled time
- Task has been disabled - the task will not be launched at the specified time because as it has been disabled
- Task has no more runs - there are no more runs scheduled for this task
- Task has not been run - the task has not been run by some reason, even if the task will be launched at the next scheduled time or the task is a recurring one
- Task is not scheduled - the trigger is not specified
- Task has no valid triggers - the task has no triggers or the existing triggers are disabled or not specified.
Certain time and/or date can be specified for Triggers running at. Below there are some examples showing variety of ways for Triggers setup:
1. Once
Specify a particular date and time for a task to be executed once. Choose "Once" option from the "Schedule task" drop down list.
2. Daily recurring
This option arranges a day to start/ finish a task recurring set to be executed once or several times at a specified time. Choose "Daily" option from the "Schedule task" drop down list. Customize other options like "Start time" and "Every... day(s)".
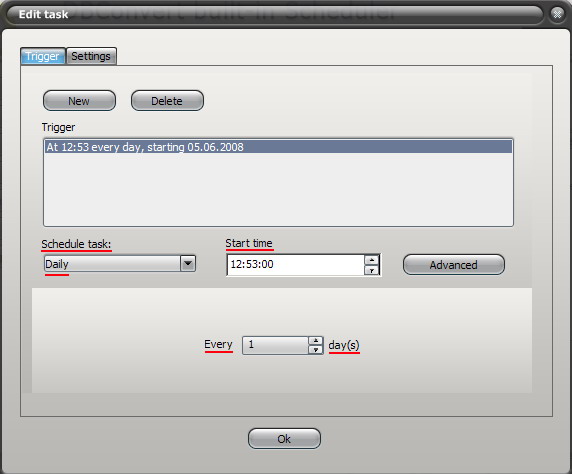
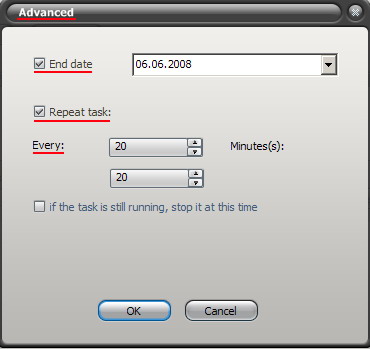
"Advanced" button opens up additional options for a current task.
"End date" option means for specifying the end date of the task execution.
Check "Repeat task" option to define the exact task duration.
If the previously specified job is still running you can check an option to stop it compulsory using this option "If the task is still running, stop it at this time" check box.
3. Weekly recurring
A task will be run on weekly basis on the definite day of a week at the specified time. Choose "Weekly" option from the "Schedule task" drop down list. Customize options "Start time" and "Every... week(s)" in this dialog.
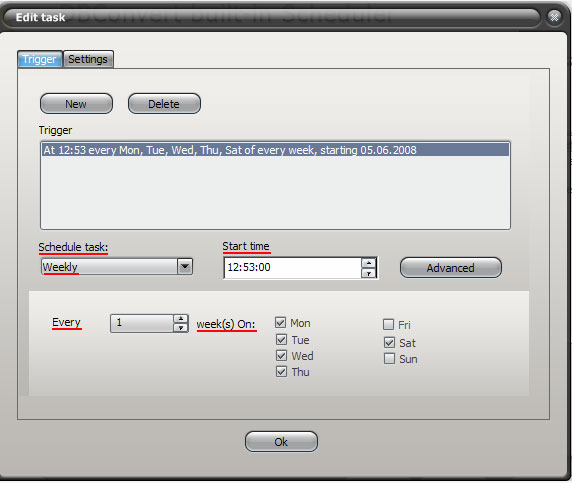
Advanced settings for weekly recurring are completely the same as they are for Daily recurring.
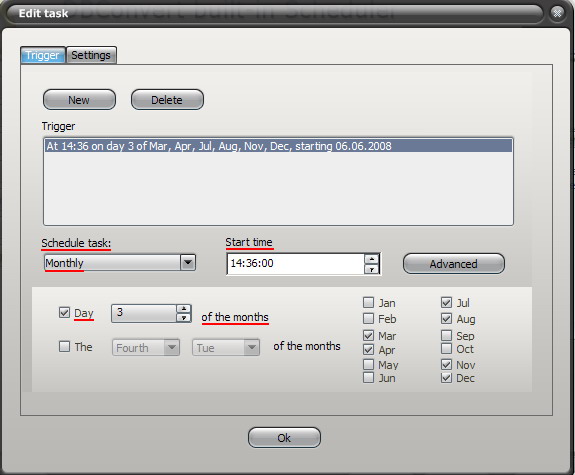
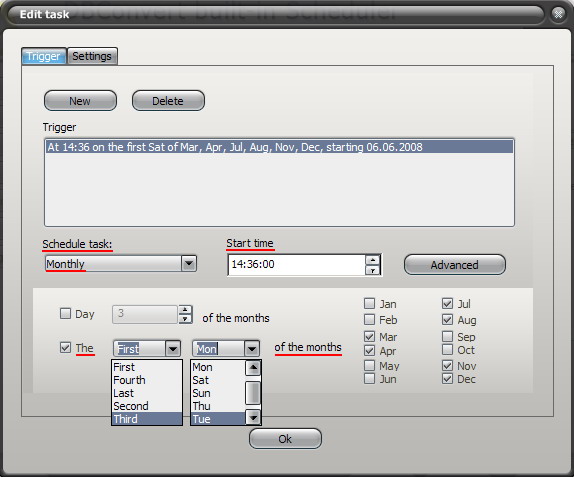
4. Monthly recurring
A task will be executed on monthly basis on the specified day of the month and at the specified time. Choose "Monthly" option from the "Schedule task" drop down list. Customize other settings as shown below.
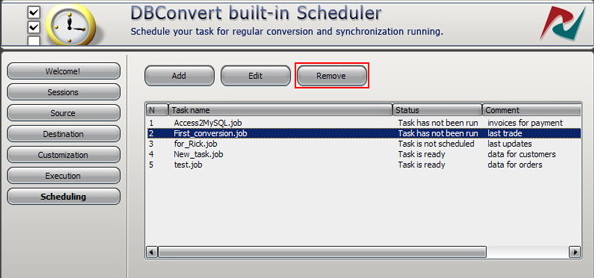
Remove Task
Press "Remove" button to remove a task if you don't need it anymore.